Effects and Processing
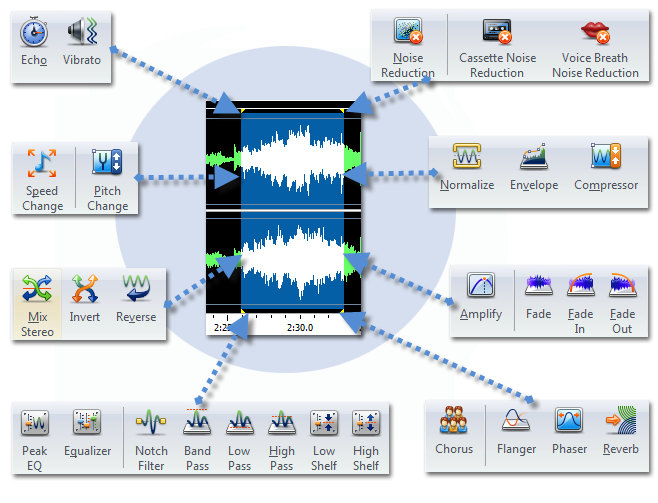
Choose from over 40 audio effects and processes
with more than 200 presets, including 18 DirectX® Audio
Plug-Ins and over 10 new automatable effects.
Create
Normalize, EQ, Delay, Chorus, Volume, Dynamics, Noise
Gate, Pitch Shift, Flange, Vibrato and other effects
by utilizing new automated FX parameters and envelope
control!

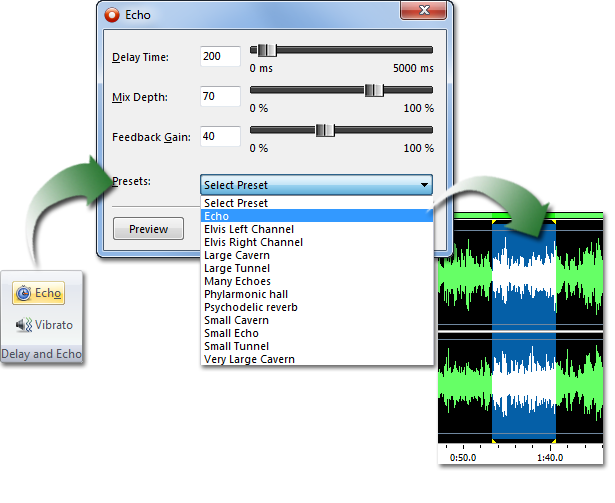
Presets
Some effects come
with a series of options known as "Presets". The idea
behind presets is to save you having to fiddle around
with the numbers, which is great if the numbers don't
mean a lot to you. Instead, you can just browse the
preset list and select the option which best describes
the effect you are trying to achieve.

Amplify
To 'amplify' is to increase the loudness or volume
of the selected region. To make a part of the recording
softer or louder, select it and then use the menu Effects
-> Amplify. The volume is entered in percent (100 being
no change, 50 being -6dB softer or 200 being +6dB louder).
Normalize
To 'normalize' is to adjust the volume so that the
loudest peak is equal to (or a percentage of) the maximum
signal that can be used in digital audio. Usually you
normalize files to 100% as the last stage in production
to make it the loudest possible without distortion.
High-Pass Filter
A high-pass filter (sometimes called a low cut filter)
removes all low frequencies below a specified Hz. This
is useful if you want to make your recording sound 'clearer'
or less 'muddy'. It is very usual to use a high-pass
filter of about 300Hz on all voice recordings to improve
intelligibility.
Equalizer
An equalizer changes the frequency response of a
signal so it has different tonal qualities.
After you select Effects menu -> Equalizer you will
see a graph of amplitude against frequencies. Left click
on any slider bar to create a new band point.
To assist you with shaping the Equalizer graph in
the way you want, there is a preset list that displays
the most common sorts of filters used in the Equalizer
graph. You can choose any preset filter from the list
and then manipulate the filter to achieve the effect
you desire.
If you are using the equalizer simply to drop lower
frequencies, you should always try the High Pass filter
first (Effects menu -> High Pass Filter), because it
is better and faster for very low frequencies.
Echo
You can use this function to create single echoes,
as well as a number of other effects. Delays of 35 milliseconds
(ms) or more will be perceived as discrete echoes, while
those falling within the 35-15 ms range can be used
to create a simple chorus or flanging effect. (These
effects will not be as effective as the actual chorus
or flanging effects, as the delay settings will be fixed
and will not change over time).
For more information about delay effect see:
http://www.harmony-central.com/Effects/Articles/Delay
Reverb
Reverb is many small reflections of the sound that
come after a set time. It usually occurs when someone
is speaking in a room, hall etc. More reverb is called
wet, no reverb is called dry.
For more information about flanging effect see:
http://www.harmony-central.com/Effects/Articles/Reverb/
Reverse
This effect reverses the selection in the same way
playing a record or tape backwards would.
Fade In
Fade Out
Fade Out and Trim
To fade in or out use the menu Effects -> Fade In
or Effects -> Fade Out.
The fade out and trim option is a combined function
which fades out over the selection then marks the end
of the selection as the end of the file. This is frequently
used at the end of music tracks.
Envelope
The 'envelope' is the change in volume of the select
region over time. This can be used to make fine adjustments
to the volume over time or even more crude changes like
fade in or fade out.
Select the region you want to change the volume over
and use the menu Effects -> Envelope. Click on any point
to adjust its volume.
Speed Change
Normal speed changes changes the pitch in proportion
to the speed. If you want to change the speed but keep
the pitch the same use this function.
Pitch Change
This changes the pitch of the recording without changing
the speed (i.e. the converse of the above).
Dynamic Range Compressor
A Dynamic Range Compressor limits the volume levels
of a sound recording so that it stays within a certain
loudness range.
An example of where it is used is in TV broadcasting,
where it ensures that the volume levels of ads are perceived
as being louder than the television program itself (without
any change in the actual broadcast volume).
It also has a use for recording audio from one medium
to another, where the two mediums are not capable of
handling the same range of volume levels (e.g. A CD
can handle a much greater range than a cassette tape).
The "Threshold" setting works by detecting when the
sound recording volume exceeds a defined decibel level.
It then gradually attenuates the sound to bring it down
below the dB level, and does it in such a way that the
listener will not be aware the attenuation is occurring.
Flanger
Flanging is created by mixing a signal with a slightly
delayed copy of itself, where the length of the delay
is constantly changing. It is actually one specific
type of phasing (Phaser).
For more information about flanging effect see:
http://www.harmony-central.com/Effects/Articles/Flanging
Reverb
It is the sound you hear in a room with hard surfaces
where sound bounces around the room for a while after
the initial sound stops.
For more information about flanging effect see:
http://www.harmony-central.com/Effects/Articles/Reverb
Chorus
The Chorus differs from the Flanger in only a couple
of ways. One difference is the amount of delay that
is used. The delay times in a Chorus are larger than
in a Flanger, usually somewhere between 20 ms. and 30
ms. (the Flanger's delay usually ranges from 1 ms. to
10 ms.) This longer delay doesn't produce the characteristic
sweeping sound of the Flanger. The Chorus also differs
from the Flanger in that there is generally no feedback
used.
For more information about chorus effect see:
http://www.harmony-central.com/Effects/Articles/Chorus


